I fancied getting an eink screen to use for future projects. I bought a wee one with a raspberry pi “hat” attached. However, I realised later that I could maybe just re-purpose an old Amazon Kindle ebook reader.
I’ve messed with Kindles before, ages ago: I ported an Infocom interpreter and a Manga reader to it. I managed to get Amazon’s own software to load them as “Kindlets” and show them integrated into their ebook reader. However, now I just want a nice cheap Linux based eink development platform.
Cheap Kindle From Ebay (and why)
So, off to ebay I went! I saw a number of really cheap ones marked “BLOCKED BY AMAZON”; I decided not to go for these since theoretically they might have been stolen. In the end, I went for £7 Kindle 4 “non-touch”.
A few days later, it turned up. And I discovered why it might have been so cheap: its stuck in some sort of unquittable demo mode:

I did some googling and although it seems later Kindle versions can be un-demo-mode-ed, nothing seemed to work for this version. I don’t actually care though; I don’t want to run the original Kindle ebook software on this.
So, the next step is to gain access. Browsing the mobileread forums showed it has a debug serial port: time to open the case!
Physical Access Granted!
This was kinda tricky! There are multiple clips all round it and the case is glued onto the battery compartment, so judicious application of a Big Knife was required to persuade it to let go. I cleaned the glue up with some Acetone.
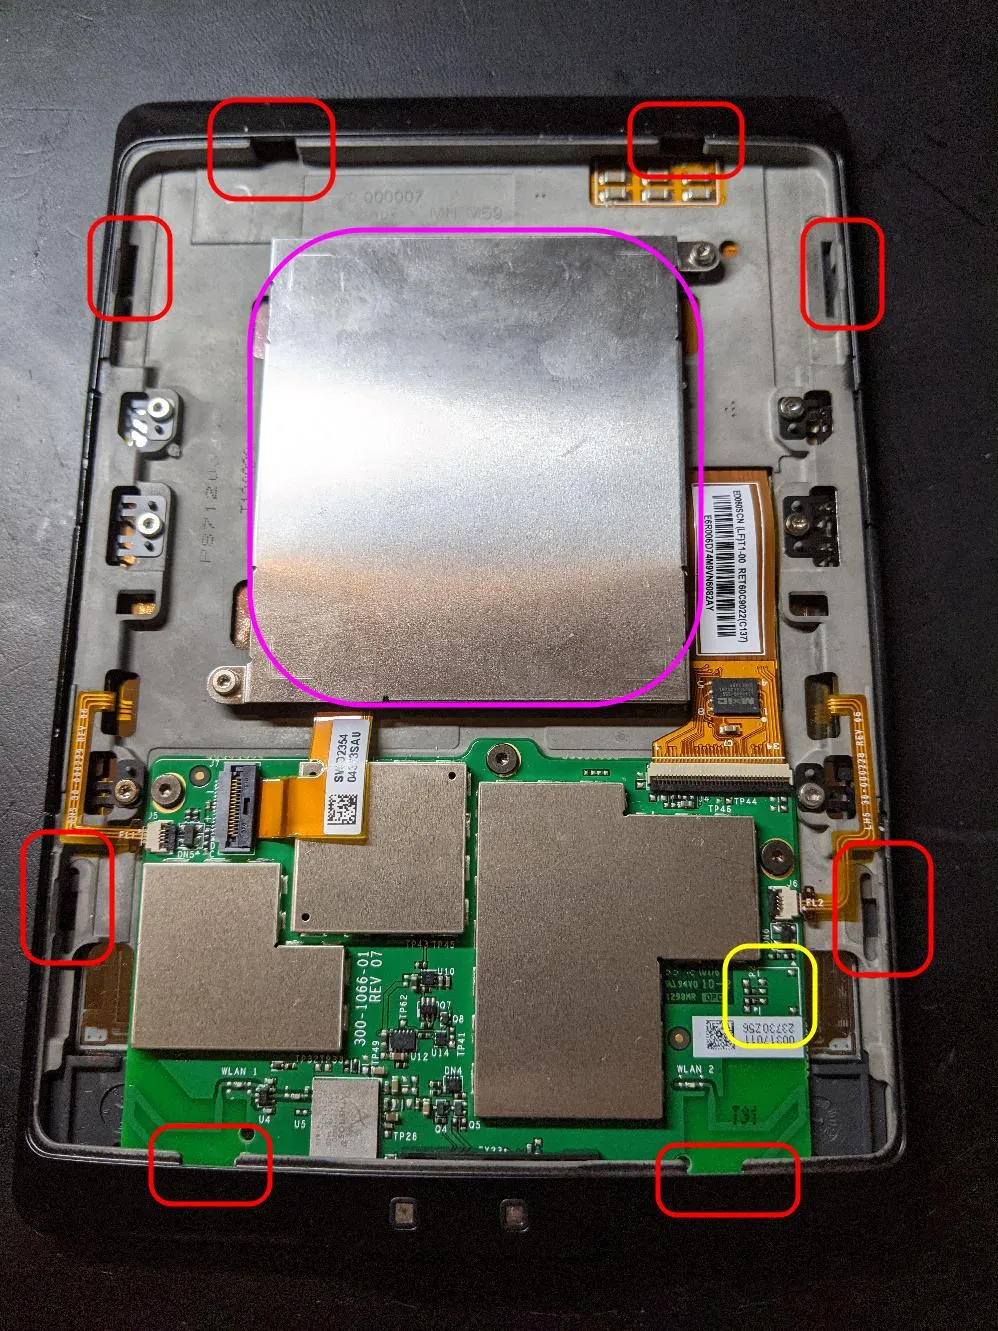
- Red: annoying clips
- Purple: really annoying glue.
- Yellow: the serial port!
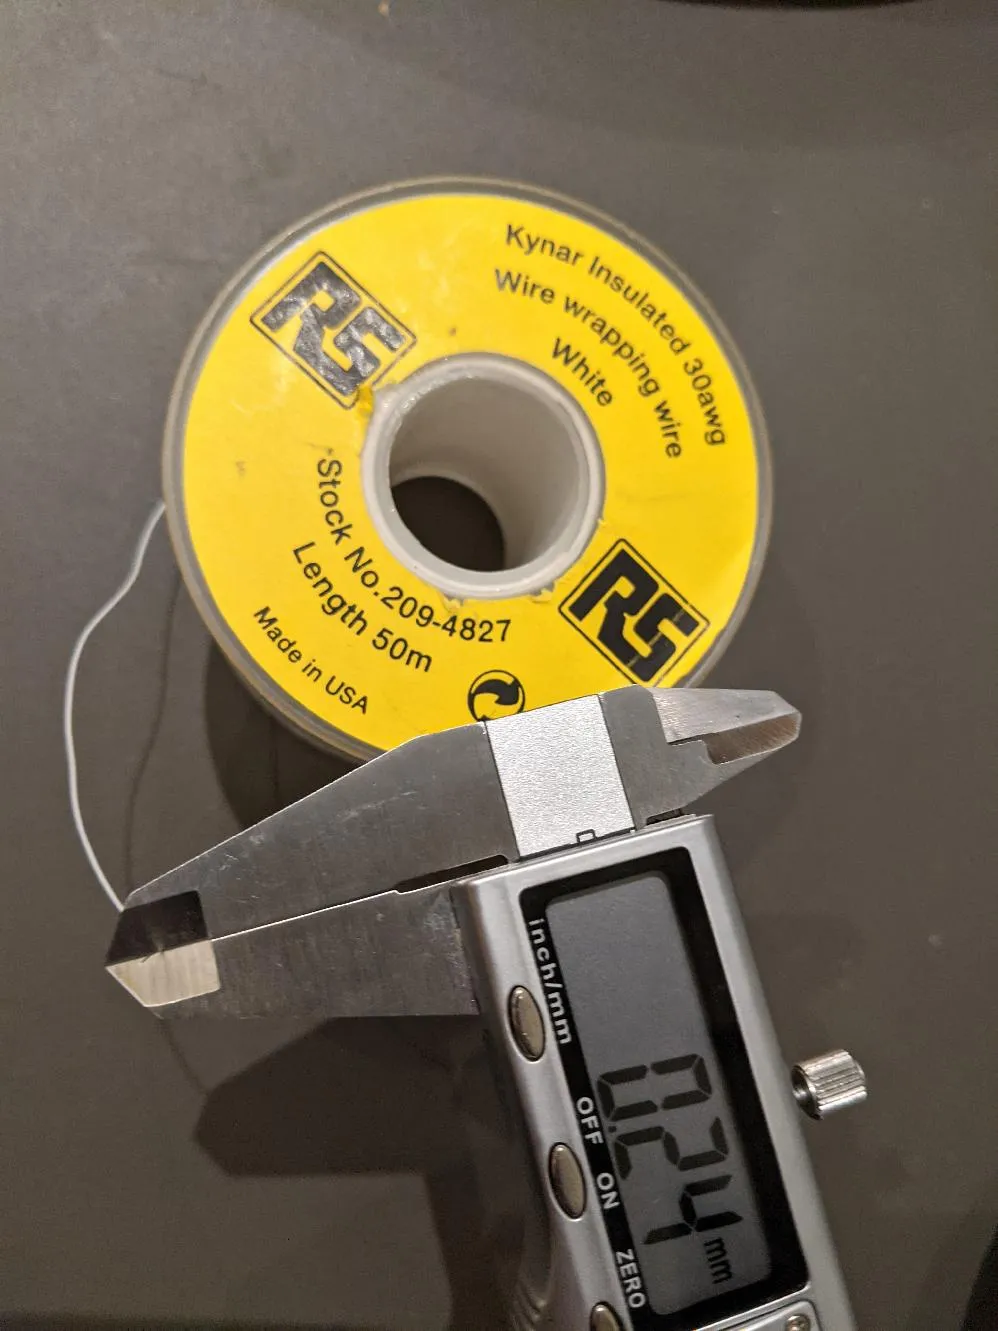
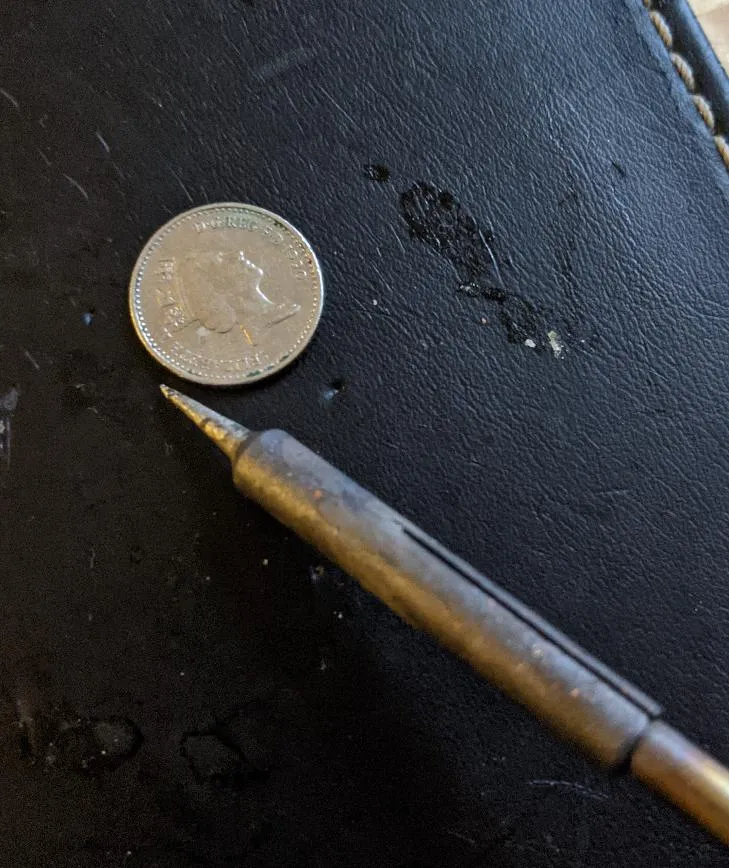
As usual for this sort of thing, the serial port is missing its socket, so we need to solder onto the tiny contacts on the board. I like to use ~0.2mm wirewrap wire for this sort of thing, and the surface mount rework bit for my soldering iron:
I don’t want to leave any wires flapping about, but I also know at some point I’m going to screw up and need serial port console access, so I came up with a solution and attached it:
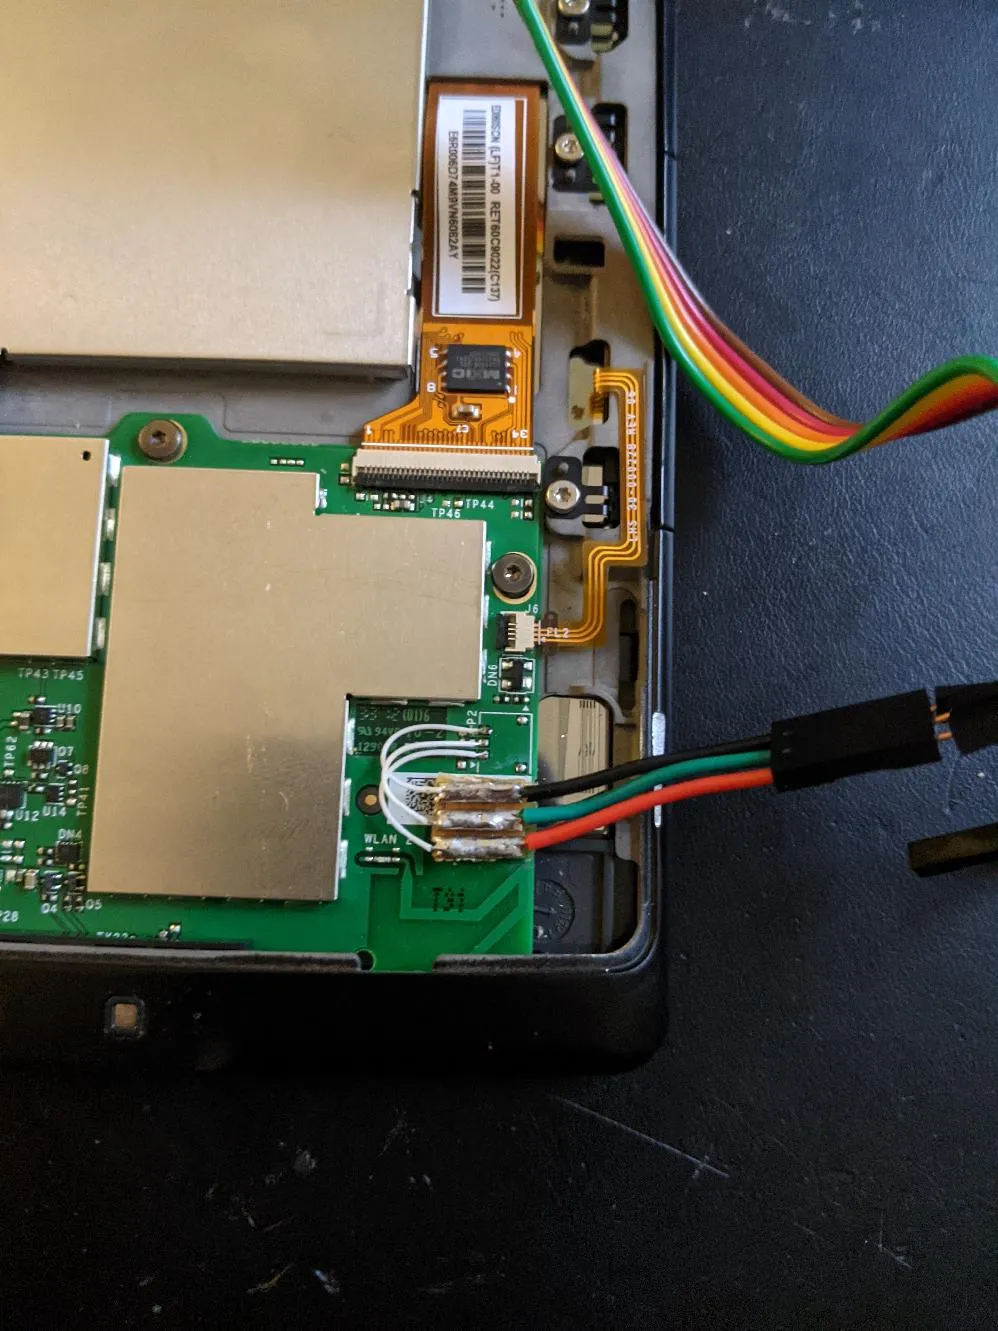
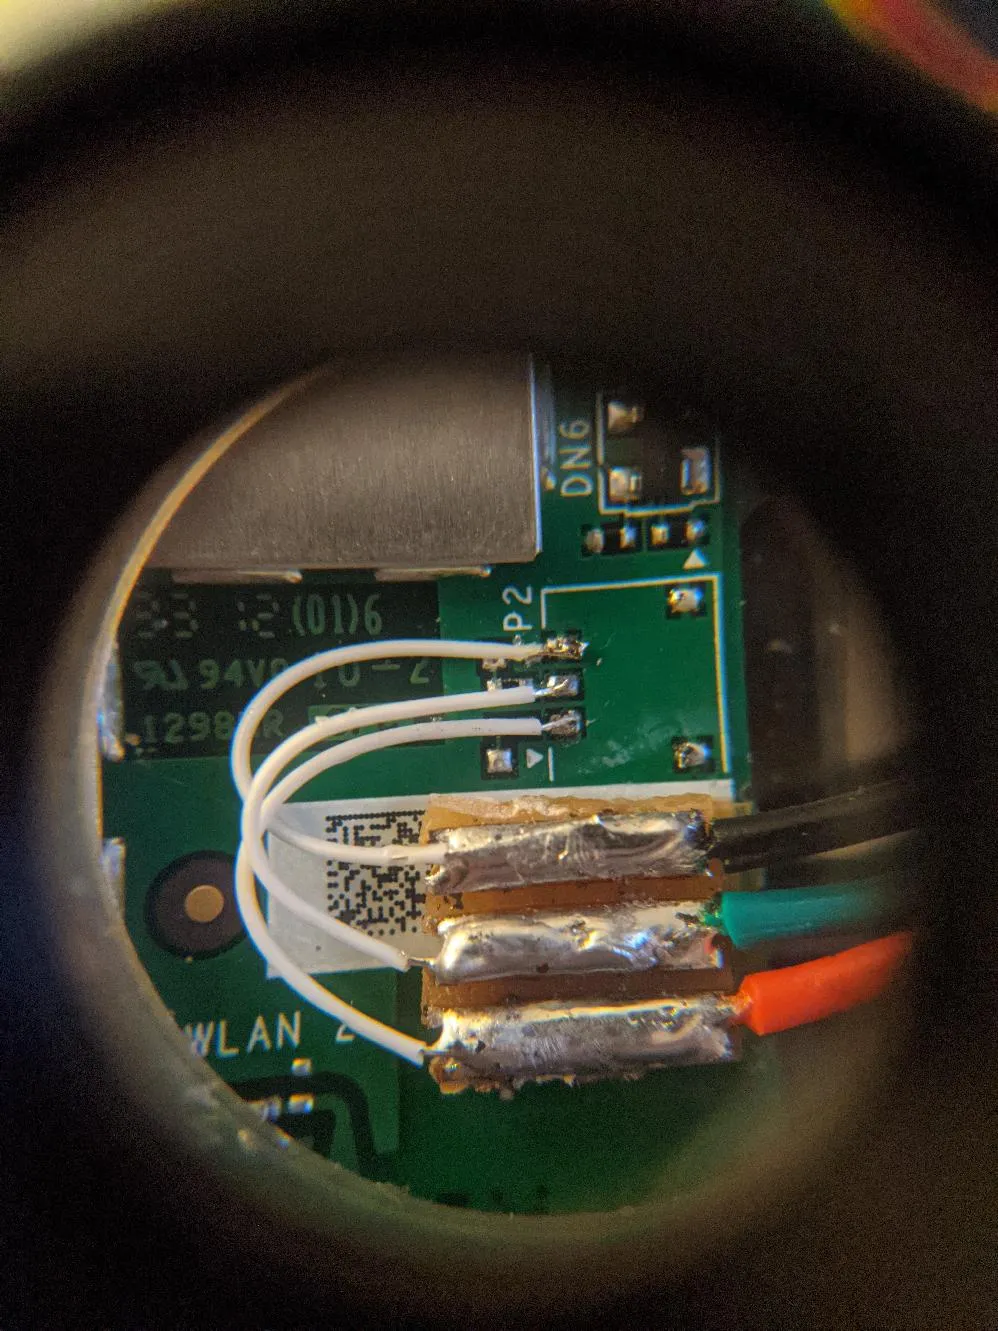
I superglued a piece of Veroboard onto the kindle’s PCB, then soldered wirewrap wires from the tiny PCB contacts onto one end. Finally, I soldered a larger, more conventional “Dupont” cable socket on the other end so I could easily attach and detach from it. Oh, the top cable on the Kindle PCB is 0v/GND, the others are TX and RX (I forget the order of those two).
Final hurdle: the kindle serial port runs at 1.8v, so I needed a serial port adaptor which supports that:
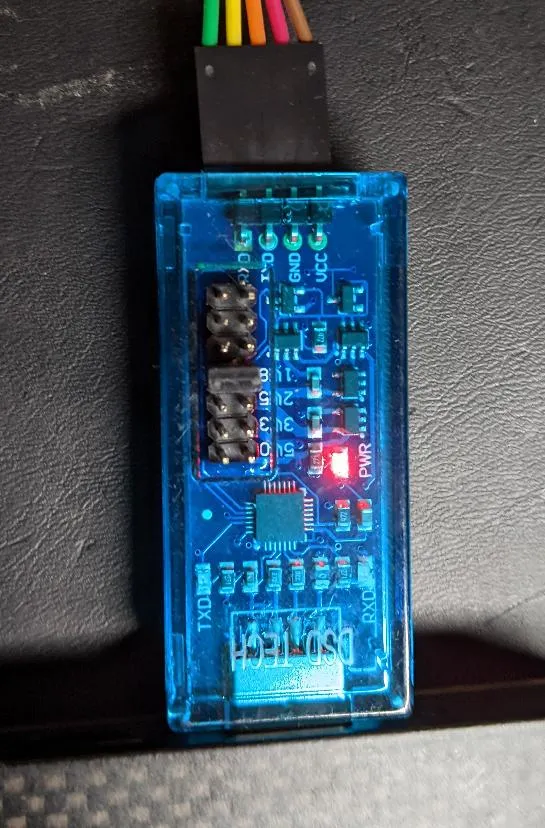
The one I bought does 5v. 3.3v, 2.5v, and 1.8v: it’s pretty neat!
Root Access Granted!
Next, I attached the serial adapter to my laptop, ran the minicom serial port software and rebooted the Kindle. Then, once I (inevitably) swapped the TX and RX wires around, I was greeted by this!
U-Boot 2009.08-lab126 (Aug 29 2012 - 12:55:24)

CPU:   Freescale i.MX50 family 1.1V at 800 MHz
mx50 pll1: 800MHz
mx50 pll2: 400MHz
mx50 pll3: 216MHz
ipg clock     : 50000000Hz
ipg per clock : 50000000Hz
uart clock    : 24000000Hz
ahb clock     : 100000000Hz
axi_a clock   : 400000000Hz
axi_b clock   : 200000000Hz
weim_clock    : 100000000Hz
ddr clock     : 800000000Hz
esdhc1 clock  : 80000000Hz
esdhc2 clock  : 80000000Hz
esdhc3 clock  : 80000000Hz
esdhc4 clock  : 80000000Hz
MMC:  FSL_ESDHC: 0, FSL_ESDHC: 1
Board: Tequila
Boot Reason: [POR]
Boot Device: MMC
Board Id: 0031701123730Z56
S/N: B02317022392005M
Initing MDDR memory
ZQ calibration complete: 0x128=0xfffe0010 0x12C=0xffffffff
DRAM:  256 MB
Using default environment

In:    serial
Out:   logbuff
Err:   logbuff
Quick Memory Test 0x70000000, 0x10000000
POST done in 13 ms
Hit any key to stop autoboot:  0
## Booting kernel from Legacy Image at 70800000 ...
   Image Name:   Linux-2.6.31-rt11-lab126
   Image Type:   ARM Linux Kernel Image (uncompressed)
   Data Size:    4777568 Bytes =  4.6 MB
   Load Address: 70008000
   Entry Point:  70008000
   Verifying Checksum ... OK
   Loading Kernel Image ... OK
OK
Starting kernel ...

[snip]

Welcome to Kindle!

kindle login:
Great, so that’s booting the uboot bootloader, then booting into linux and asking me to login.
Trying to login as root prompts for a password: Hmm… However, I already knew from previous Kindle stuff that you can generate the password from the serial number. I found this website which generates a number of possible passwords for a specific device: Mine was the third on the list.
In case that site dies here’s the key snippet of Javascript:
var md5 = hex_md5(serial);
document.getElementById("rootpw").innerHTML = "fiona" + md5.substring(7,11);
document.getElementById("rootpw2").innerHTML = "fiona" + md5.substring(7,10);
document.getElementById("rootpw3").innerHTML = "fiona" + md5.substr(13,3);
Oh: I forgot to mention how I extracted the device’s serial number. Well, plugging it into USB doesn’t really “work”: you can’t mount these demo devices as disks. But, under linux, it still outputs the serial number in linux’s dmesg output (you can also get it using printenv in uboot if you press enter when it says “Hit any key to stop autoboot”):
[128033.676587] usb 1-2: new high-speed USB device number 51 using xhci_hcd
[128033.829631] usb 1-2: New USB device found, idVendor=1949, idProduct=0004, bcdDevice= 1.00
[128033.829638] usb 1-2: New USB device strings: Mfr=1, Product=2, SerialNumber=3
[128033.829642] usb 1-2: Product: Amazon Kindle
[128033.829645] usb 1-2: Manufacturer: Amazon
[128033.829648] usb 1-2: SerialNumber: XXXXXXXXXXXXXXXX
Cool! We have root and can login! Now to figure out how to make it a bit easier to do stuff on it.
Dumping The System
First step is usually to dump the disks for analysis on another computer.
Checking /proc/mounts shows multiple partitions of the main disk on /dev/mmcblk0.
Running fdisk /dev/mmcblk0 gives the following:
Units = cylinders of 64 * 512 = 32768 bytes

        Device Boot      Start         End      Blocks  Id System
/dev/mmcblk0p1   *        1025       12224      358400  83 Linux
/dev/mmcblk0p2           12225       14272       65536  83 Linux
/dev/mmcblk0p3           14273       15296       32768  83 Linux
/dev/mmcblk0p4 15297 59776 1423360 b Win95 FAT32- So, four partitions, three linux, and one FAT32.
- The first disk starts quite far into the disk: turns out the kernel is stored in that “missing” area.
- Poking about a bit more shows partition 1 is the normal system, 2 is a sort of diagnostic tool partition, 3 is for storing internal private state of the kindle (eg wifi passwords). Finally, 4 is the one you see when you plug a kindle in over USB: its where your books would reside.
- Partition 4 is mounted at /mnt/us.
I dumped the start of the disk and partitions 1-3 onto /mnt/us using dd (I like to take a complete raw image if I can so I can restore it in case something goes wrong):
dd if=/dev/mmcblk0 of=/mnt/us/kindle.img bs=32768 count=15297Although this Kindle doesn’t show a disk over USB, since I have root, I can simply make it do it:
rmmod g_file_storage
modprobe g_file_storage file=/dev/mmcblk0p4
It popped up on my laptop so I copied everything off.
System Analysis
Finally, I mounted the partitions in kindle.img on my laptop with:
kpartx -v kindle.imgI could then mount the individual partitions on my laptop. I extracted all the files into a folder so I could poke around them and grep them easily. I figured out:
- It uses
rc.das its system init system, so there are lots of nice plain text scripts. - Init level 5 is the “normal” system running the ebook software
- The ebook software is in
/opt/amazonand is in Java (I kinda already knew this, but needed a quick refresher). - There’s a whole load of interesting plain text “diag” scripts for testing.
- There’s a rather nifty
wifiddaemon for managing the wifi connection: I figured out how to talk to this from the diag scripts. - You can write to the eink screen from the command line using the
/usr/sbin/eipscommand (docs here). - I couldn’t find an obvious “turn off demo mode” switch: it appears the demo mode is a customised build of the Java ebook software.
- The following system services are to do with unsupported features, the ebook software, or talking back to amazon:
S50wan S70wand S75phd S81usbnetd S93webreaderd S94browserd S95framework S96boot_finished.
Talking To Wifid
You can use the built in wifid to connect to wifi and manage your wifi profiles. Oh, also, remember many Kindles only support 2.4Ghz wifi when you wonder why it isn’t working ;)
List number of WIFI profiles:
lipc-get-prop com.lab126.wifid profileCount
Show contents of a WIFI profile:
echo "{index=(0)}" | lipc-hash-prop com.lab126.wifid profileData
Delete a WIFI profile:
lipc-set-prop com.lab126.wifid deleteProfile WIFIESSID
Create a WIFI profile:
echo '{essid="WIFIESSID", smethod="wpa2", secured="yes", psk="WIFIPSK"}' | lipc-hash-prop com.lab126.wifid createProfile
smethod can be one of open,wep,wpa,wpa2 (if you choose open, set secured to “no”)
WIFIPSK is the WIFI PSK as generated with the wpa_passphrase utility (which is actually on the kindle): a normal “wifi passphrase” will not work.
Connect a WIFI profile:
lipc-set-prop com.lab126.wifid cmConnect WIFIESSID
Show WIFI connection status:
echo "{index = (0)}" | lipc-hash-prop -n com.lab126.wifid currentEssid
Making Changes To Root
Many of the following instructions need to change the root disk on the kindle. However, by default it is mounted in read only mode, preventing modification. To fix, run this command on the kindle:
mntroot rwWhen done, set it back to read only mode to prevent any unwanted changes:
mntroot roInstalling Dropbear SSH
I wanted to be able to ssh into my kindle, so I needed to install the dropbear ssh daemon. Of course this is an ARM based device, so I either had to compile it myself or find it somewhere. Luckily there’s a maintained USBNET hack for the kindle: I opted not to use that hack myself as I want to be in complete control of this development box, but I can still borrow the dropbear binary from it.
Unfortunately USBNET is delivered in the Kindle’s own bizarre update format, so we need to extract it from that:
On your computer:
- Download this git repo and compile it - this lets us decode kindle updates.
- Download kindle-usbnetwork-0.57.N-k4.zip from here and copy it into
KindleTool/Release/. cd KindleTool/Release/unzip kindle-usbnetwork-0.57.N-k4.zip./kindletool extract Update_usbnetwork_0.57.N_k4_install.bin usbnetcd usbnettar Jxf usbnet.tar.xz- Copy
src/usbnet/bin/dropbearmultionto your Kindle (I remounted it as a USB device and copied it over).
On the Kindle:
cd /mv /mnt/us/dropbearmulti /chmod a+x /dropbearmultiln -sf /dropbear /dropbearmultiln -sf /dropbearkey /dropbearmultiln -sf /bin/scp /dropbearmulti/dropbearkey -t rsa /dropbear_rsa_host_key
Converting For My Use
I renamed all the unwanted system services like this:
cd /etc/rc5.d; mv S95framework DISABLED.S95frameworkI added my own init script at /etc/rc5.d/S99adq to add my own customisations:
#!/bin/sh
NAME="adq"
case "$1" in
start)
# display some stuff!
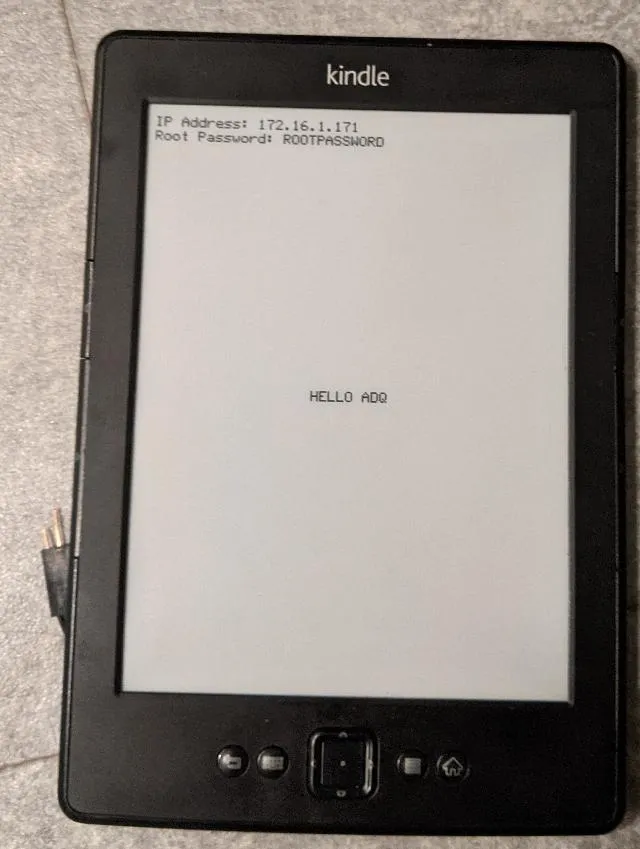
/usr/sbin/eips -c 20 20 "HELLO ADQ"
IP=`ifconfig wlan0 | awk '/t addr:/{gsub(/.*:/,"",$2);print$2}'`
/usr/sbin/eips 1 1 "IP Address: $IP"
/usr/sbin/eips 1 2 "Root Password: <MY ROOT PASSWORD>"
/usr/sbin/eips ""
# connect to wifi and allow ssh in
lipc-set-prop com.lab126.wifid cmConnect MYWIFISSID
iptables -A INPUT -i wlan0 -p tcp --dport 22 -j ACCEPT
/dropbear -r /dropbear_rsa_host_key
mkdir -p /mnt/us/usbnet/etc
echo "<MY SSH PUBKEY>" > /mnt/us/usbnet/etc/authorized_keys
# expose shell over usb
modprobe -r g_file_storage
modprobe g_serial
/sbin/getty -L 115200 ttyGS0 -l /bin/login &
;;
stop)
;;
*)
msg "Usage: /etc/init.d/$NAME {start|stop}" W >&2
exit 1
;;
esac
exit 0- Show some useful info on the ebook screen on bootup
- Connect to wifi.
- Allow SSH in through the firewall.
- Run the dropbear ssh daemon.
- Add my ssh public key into the right place for dropbear.
- Remove the “pretend to be a disk” over USB feature
- Make it “pretend to be a serial device” over USB and give a login prompt: If I plug it in via USB and use minicom, I get a login prompt… just in case something goes wrong.
On bootup, my kindle now looks like this, and I can ssh into it as root.
That’s it pretty much done: I can now ssh into my kindle and I’ve got multiple levels of serial console I can use to get in if/when something goes wrong. Its quite a neat little wifi-enabed, battery-powered, e-ink linux development system.
Final tweak was to knock off some of the clips from the back cover and clip it back on to protect the circuitry.
Future
This library (FBInk) looks like it could replace the Amazon eips software; probably better if I wanted to integrate the display into my own software.
13 Comments
ajaxnz ·
I got a remarkable2 and returned it. Lovely hardware. Software for note taking etc was nice, but didn't do left handed very well (didn't rotate the device and its not symmetric so that made holding it tricky). Integration with rest of world for getting documents out was absolute pants.
Turning an ragged Amazon Kindle into a eInk vogue platform ·
[…] FeedbackRead More […]
Turning An Old Amazon Kindle Into A EInk Development Platform | Afrkbey ·
[…] CommentsRead More […]
Turning an old Amazon Kindle into a eInk development platform - Invest for the future ·
[…] CommentsRead More […]
Turning an old Amazon Kindle into a eInk development platform – Nuvery ·
[…] CommentsRead More […]
Turning an old Amazon Kindle to a eInk development Stage ·
[…] CommentsRead More […]
frans ·
have you considered using a more hackable device, e.g. reMarkable? Has better user interface, more memory, and there are Qt based example projects (even a ported desktop environment) available..
Turning an old Amazon Kindle into a eInk development platform – Cyber Geeks Global ·
[…] CommentsRead More […]
adq ·
OOoo no I hadn't: an eink writer tablet looks very cool!
However, they are quite a lot more that £7 from a cursory check of ebay...?
Turning an old Amazon Kindle into a eInk development platform – Site Title ·
[…] Turning an old Amazon Kindle into a eInk development platform 16 by miles | 7 key aspects to get started in the world of online women dating […]
adq ·
For a more papery solution, N is trying "Rocketbook" and seems to be liking it a lot so far.
Linked: Turning an old Amazon Kindle into a eink development platform – Nebulous Logic ·
[…] Linked: Turning an old Amazon Kindle into a eink development platform […]
Lenny ·
I just stumbled across this. I am really keen to try it out myself. I have always wanted to try make my own Very Slow Movie Player, but the price of an eink screen has always been a bit of a hindrance. If you have root access to the kindle and the ability to draw what you want then I imagine it shouldn't be too hard to write a simple script to display the next image from a folder of stills dumped from the movie. Cheers!